Have you ever hesitated to make crème brûlée at home, thinking it’s too complicated or fancy? I used to feel the same way. For years, I considered this creamy, caramelized dessert something to be enjoyed only at upscale restaurants. That was until I discovered how surprisingly simple it is to create in my own kitchen.
Today, I’m sharing my foolproof method for making the perfect crème brûlée that will impress your family and friends while requiring minimal effort and ingredients. This classic French dessert might seem intimidating, but I promise you – if I can master it, so can you.
The Magic of Crème Brûlée
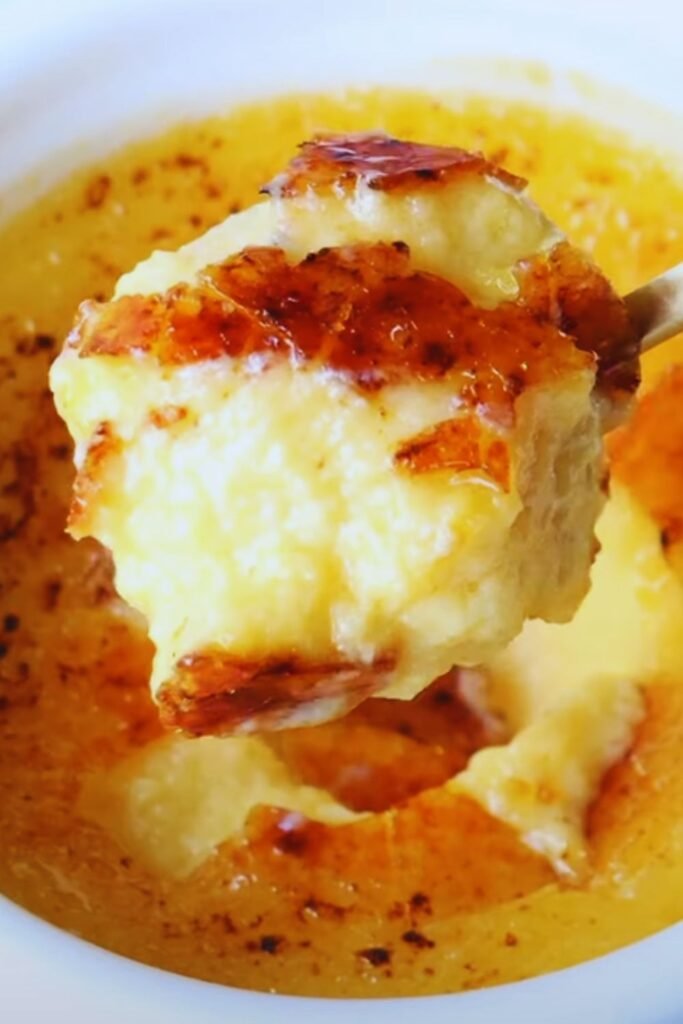
Crème brûlée, which translates to “burnt cream,” is a study in delightful contrasts. The dessert features a rich, silky custard base topped with a layer of hardened caramelized sugar that cracks satisfyingly when tapped with a spoon. This textural interplay – smooth, creamy custard beneath a thin, crisp caramel shell – creates an unparalleled sensory experience.
What I love most about this dessert is its elegant simplicity. With just a handful of quality ingredients – egg yolks, cream, sugar, and vanilla – you can create something truly extraordinary. The magic happens in the technique, not in complex ingredient lists or elaborate preparations.
Equipment You’ll Need
Before we dive into the recipe, let’s make sure you have the proper equipment on hand. Don’t worry – you won’t need any specialized pastry tools to make this work:
- 4-6 ramekins (4-6 oz size works best)
- Large baking dish (for water bath)
- Mixing bowls
- Whisk
- Fine mesh strainer
- Kitchen torch (preferred) or broiler
- Instant-read thermometer (optional but helpful)
- Plastic wrap
If you don’t own a kitchen torch, don’t fret. While it does give you more control over the caramelization process, your oven’s broiler can work in a pinch. I’ll cover both methods.
Ingredients Breakdown
For 4 servings of my easy crème brûlée, you’ll need:
| Ingredient | Quantity | Notes |
|---|---|---|
| Heavy cream | 2 cups (480ml) | Use the highest fat content available (36% or higher) |
| Egg yolks | 5 large | Room temperature works best |
| Granulated sugar | 1/2 cup (100g), divided | 1/4 cup for custard, 1/4 cup for topping |
| Vanilla bean or extract | 1 bean or 1 tbsp extract | Real vanilla makes a noticeable difference |
| Salt | 1/8 tsp | Just a pinch to enhance flavors |
| Hot water | For water bath | Should be hot but not boiling |
Understanding the Role of Each Ingredient
- Heavy cream: The higher the fat content, the richer and more luxurious your custard will be. This is no place for half-and-half or milk substitutes.
- Egg yolks: These provide the custard’s structure and silky texture. The yolks contain lecithin, which acts as an emulsifier, helping the fat from the cream and the water-based ingredients combine smoothly.
- Sugar: In the custard, sugar adds sweetness and helps stabilize the egg proteins. On top, it creates that signature caramelized crust.
- Vanilla: The aromatic foundation of the dessert. A real vanilla bean provides beautiful flecks and more complex flavor, but a good quality extract works well too.
- Salt: Just a tiny pinch enhances all the other flavors without making the custard taste salty.
The Step-by-Step Process
Step 1: Prep Your Equipment and Ingredients
- Preheat your oven to 325°F (163°C).
- Arrange your ramekins in a large baking dish with high sides.
- Bring a kettle or pot of water to a near boil for the water bath.
- If using a vanilla bean, split it lengthwise and scrape out the seeds.
Step 2: Infuse the Cream
- In a medium saucepan, combine the heavy cream with your vanilla (either the bean and seeds or extract).
- Heat the mixture over medium-low heat until it just begins to simmer around the edges. Do not let it boil.
- Remove from heat, cover, and let the cream infuse for about 15 minutes if using a vanilla bean. (If using extract, you can skip this steeping time.)
A key mistake many beginners make is rushing this infusion process. Those 15 minutes of steeping make a world of difference in developing a deep vanilla flavor throughout the custard.
Step 3: Prepare the Egg Mixture
- In a medium bowl, whisk together the egg yolks, 1/4 cup (50g) of sugar, and salt until the mixture is smooth and the sugar begins to dissolve.
- The mixture should become slightly lighter in color, but don’t overwhisk – we’re not trying to incorporate air.
Step 4: Create the Custard Base
- After the cream has infused, remove the vanilla bean if used.
- Very gradually, pour the warm cream into the egg mixture while constantly whisking.
- Whisking continuously during this step is crucial to prevent the hot cream from cooking the eggs.
- Once combined, strain the mixture through a fine-mesh sieve into a clean container to remove any bits of cooked egg or vanilla pod.
Step 5: Fill and Bake
- Divide the custard mixture evenly among your ramekins.
- Place the baking dish with the filled ramekins into the preheated oven.
- Carefully pour hot water into the baking dish until it reaches about halfway up the sides of the ramekins, being careful not to splash water into the custards.
- Bake for 30-35 minutes, or until the edges are set but the centers still have a slight jiggle when gently shaken.
The internal temperature should reach about 170-175°F (77-79°C) if you’re using a thermometer. A proper water bath ensures gentle, even heating that prevents the custard from curdling or developing a rubbery texture.
Step 6: Cool and Chill
- Carefully remove the baking dish from the oven.
- Allow the ramekins to cool in the water bath for about 10 minutes.
- Remove the ramekins from the water and let them cool completely on a wire rack.
- Cover each ramekin with plastic wrap and refrigerate for at least 4 hours, but preferably overnight.
This resting period is non-negotiable. The custard needs time to fully set and for the flavors to develop. I find the texture is always best when I make these a day ahead.
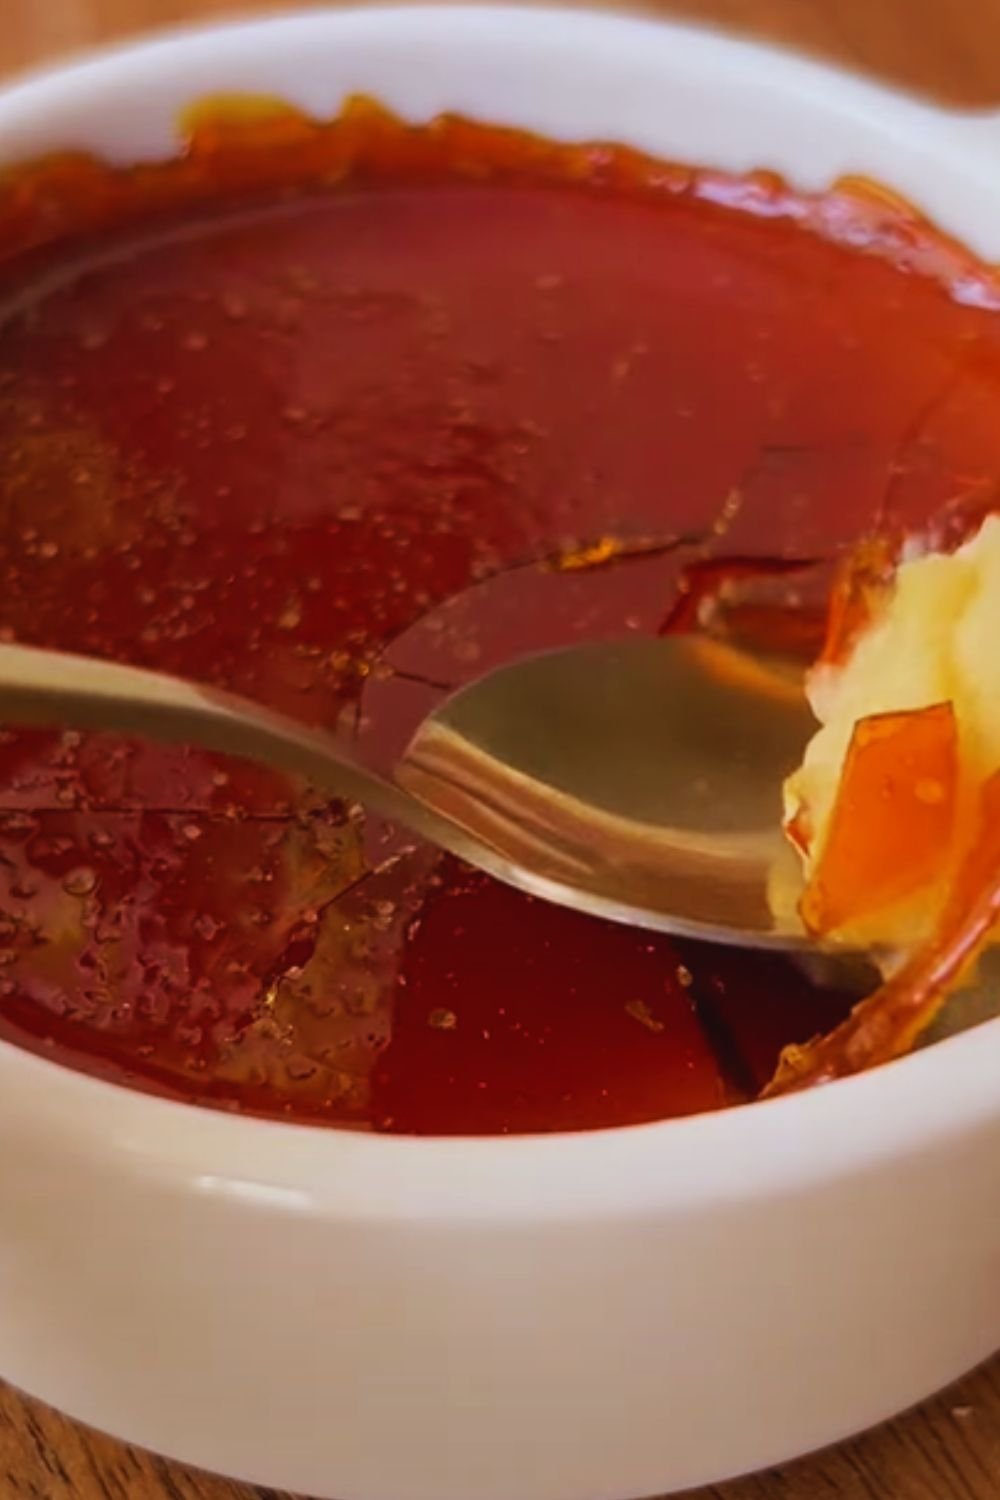
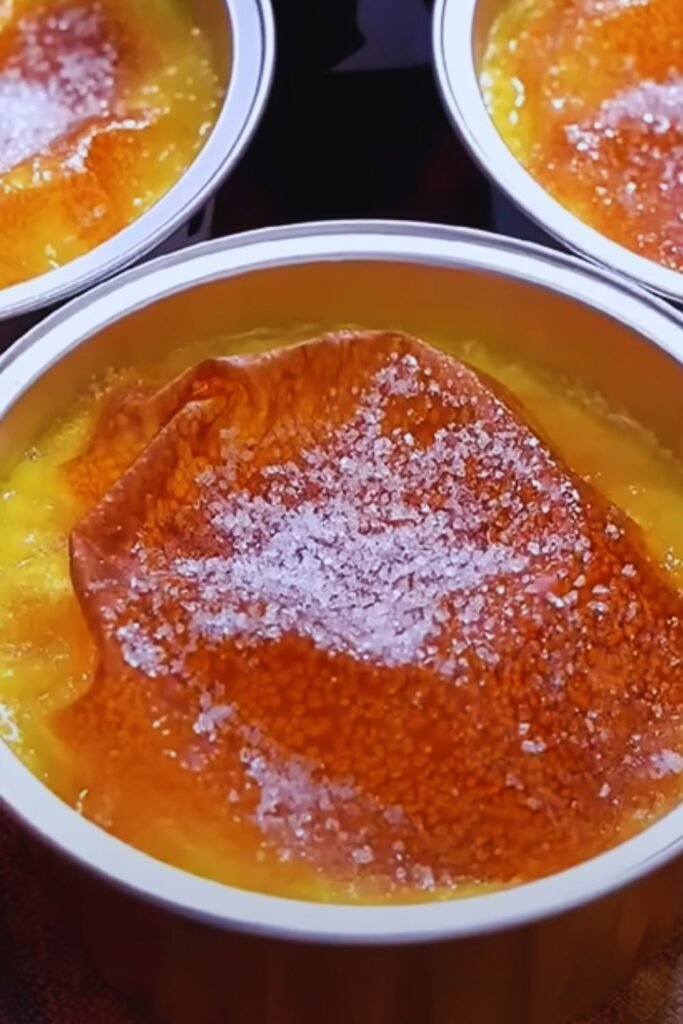
Step 7: The Grand Finale – Caramelizing the Sugar
- Just before serving, remove the custards from the refrigerator and blot any moisture from the surface with a paper towel.
- Sprinkle an even, thin layer of the remaining sugar over each custard (about 1-2 teaspoons per ramekin).
- If using a kitchen torch: Hold the torch 2-3 inches away from the surface and move it constantly in small circles until the sugar melts and turns a deep amber color.
- If using a broiler: Place the ramekins on a baking sheet and position on the top rack under the broiler. Watch carefully and rotate as needed until the sugar caramelizes (this typically takes 3-5 minutes).
- Let the caramelized sugar cool and harden for 1-2 minutes before serving.
Flavor Variations
While the classic vanilla crème brûlée is divine on its own, I sometimes like to experiment with different flavors. Here are some of my favorite variations:
| Flavor | Infusion Method | Quantity |
|---|---|---|
| Espresso | Add instant espresso powder to cream | 1-2 tbsp |
| Citrus | Add lemon or orange zest to cream | Zest of 1 fruit |
| Chocolate | Add chopped chocolate after heating cream | 2 oz (57g) |
| Lavender | Add dried culinary lavender to cream | 1 tbsp |
| Maple | Replace some sugar with maple syrup | 2 tbsp |
| Earl Grey | Steep 2 tea bags in cream | 5 minutes |
| Cinnamon | Add cinnamon stick to cream | 1 stick |
| Coconut | Replace some cream with coconut cream | 1/2 cup |
For each variation, simply add the flavoring agent during the cream infusion step and proceed with the recipe as written. The infused cream should be strained before combining with the egg mixture to remove any solid particles.
Troubleshooting Common Issues
Even with this foolproof recipe, you might encounter a few hiccups along the way. Here’s how to address the most common issues:
Custard is Runny
- Cause: Underbaking or not chilling long enough.
- Solution: Ensure you’re baking until the edges are set but the center still jiggles slightly. Always chill for at least 4 hours.
Custard Has a Grainy or Curdled Texture
- Cause: Eggs cooked too quickly or water bath was too hot.
- Solution: Use room temperature eggs, whisk constantly when adding hot cream, and ensure your water bath isn’t boiling.
Sugar Won’t Caramelize Properly
- Cause: Too thick a layer of sugar or moisture on the surface.
- Solution: Use a thin, even layer of sugar and thoroughly blot any condensation before caramelizing.
Burnt Sugar Taste
- Cause: Overcaramelization.
- Solution: Move your torch constantly and stop when you reach a medium amber color.
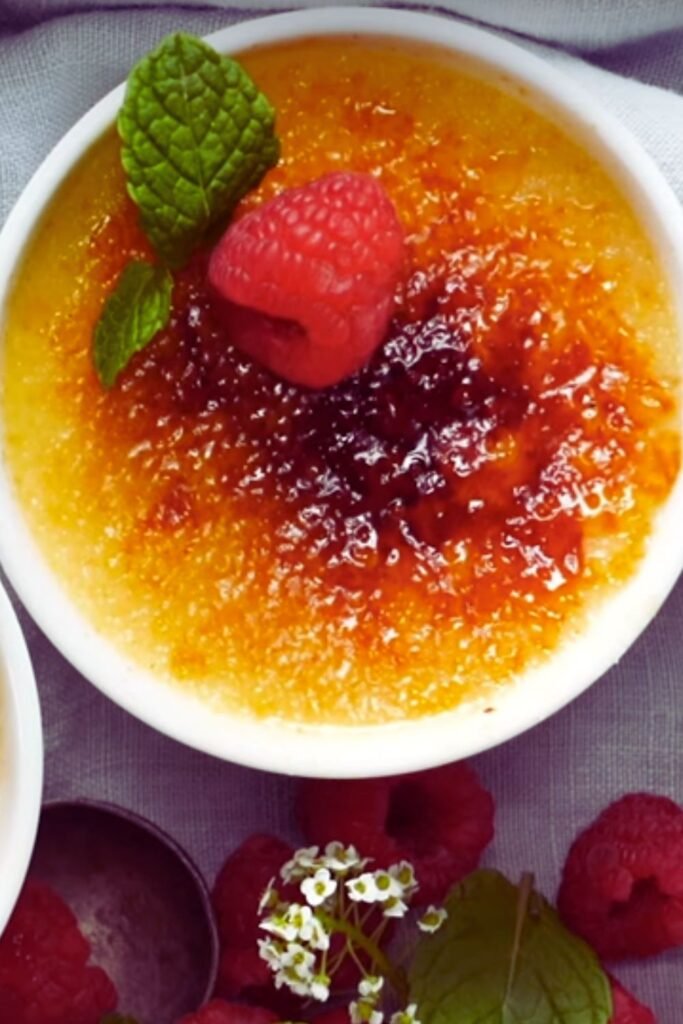
Serving Suggestions
Crème brûlée is stunning on its own, but I sometimes like to enhance the presentation with:
- Fresh berries arranged around the ramekin
- A small sprig of mint
- A light dusting of powdered sugar on the plate
- A thin butter cookie or langue de chat on the side
- A small scoop of mango or raspberry sorbet for temperature contrast
- A fresh fruit compote in a separate small dish
I find the bright acidity of berries or citrus works beautifully against the rich, creamy custard.
Make-Ahead Tips
One of the things I love most about crème brûlée is how perfectly it fits into entertaining schedules:
- The custards can be baked up to 3 days ahead and kept covered in the refrigerator.
- Always caramelize the sugar right before serving – never in advance – as the hard sugar top will soften in the refrigerator.
- If you need to transport the custards, bake them in disposable aluminum ramekins with lids and torch them at your destination.
Why This Recipe Works: The Science Behind Perfect Crème Brûlée
Understanding a bit of food science helps explain why this recipe produces such reliable results:
- The water bath ensures gentle, even heat distribution, allowing the proteins in the egg yolks to coagulate slowly without curdling.
- The high fat content of the heavy cream inhibits protein coagulation, contributing to that signature silky texture.
- The sugar in the custard interferes with the egg proteins’ ability to bind tightly, preventing the rubbery texture that can occur in overcooked custards.
- The caramelization process is actually a complex series of chemical reactions called Maillard reactions and caramelization, creating hundreds of new flavor compounds from the simple sugar.
Nutritional Information
| Nutrient | Amount per Serving |
|---|---|
| Calories | 425 |
| Total Fat | 36g |
| Saturated Fat | 21g |
| Cholesterol | 345mg |
| Sodium | 65mg |
| Total Carbohydrates | 22g |
| Sugars | 22g |
| Protein | 5g |
While definitely an indulgence, crème brûlée is naturally gluten-free and can be enjoyed in moderation as part of a balanced diet. I like to think of it as an occasional treat rather than an everyday dessert.
Questions & Answers
Q: Can I make crème brûlée without a torch?
Yes, you can use your oven’s broiler. Place the chilled custards on a baking sheet, sprinkle with sugar, and broil on the top rack for 3-5 minutes until caramelized. Watch carefully to prevent burning, and rotate the ramekins if needed for even browning.
Q: How far in advance can I make crème brûlée?
The custards can be made up to 3 days in advance and kept refrigerated. Always add and caramelize the sugar topping just before serving for the best texture contrast.
Q: My custard has tiny bubbles on top after baking. What did I do wrong?
Those tiny bubbles typically form when the custard is baked at too high a temperature or the water bath started boiling. Make sure your oven is properly calibrated and that the water bath remains at a gentle simmer at most.
Q: Can I use brown sugar for the topping?
While traditional crème brûlée uses white granulated sugar for the topping, you can experiment with brown sugar or even raw sugar (demerara or turbinado). These alternatives will caramelize differently and provide interesting flavor notes, though they may not create quite as clean a “crack” when broken.
Q: My custard is too firm. What happened?
Overbaking is the most common culprit for firm custard. Remember that custards continue to set as they cool, so remove them from the oven when the centers still have a slight jiggle. Also, check your oven temperature with an oven thermometer, as many ovens run hotter than their settings indicate.
Q: Is it possible to make a dairy-free version?
Yes, though it won’t have quite the same richness. You can substitute full-fat coconut milk for the heavy cream. The flavor will be different – more tropical and less neutral – but the texture can be surprisingly good. You may need to adjust the baking time slightly.
Q: How do I know when the custard is perfectly baked?
The perfect crème brûlée should be set around the edges but still have a slight jiggle in the center when gently shaken. If using a thermometer, the internal temperature should reach 170-175°F (77-79°C). The custard will continue to set as it cools.
Q: Can I freeze crème brûlée?
While technically possible, I don’t recommend freezing crème brûlée as the texture will never be quite the same after thawing. The emulsion can break, resulting in a grainy or separated custard.
Final Thoughts
Mastering this easy crème brûlée recipe has been one of my most rewarding culinary achievements. There’s something magical about creating such an elegant, restaurant-quality dessert with minimal ingredients and effort.
I encourage you to try this recipe even if you consider yourself a novice in the kitchen. Take your time, follow the steps carefully, and you’ll be rewarded with a dessert that never fails to impress. The beauty of crème brûlée lies in its perfect simplicity – good ingredients treated with care and respect.
Remember that like any cooking skill, practice makes perfect. Each time you make this recipe, you’ll become more confident in your ability to judge doneness, achieve the perfect caramelization, and perhaps even experiment with your own flavor variations.
So gather your ingredients, preheat that oven, and prepare to fall in love with homemade crème brûlée. Your dinner guests will think you’ve been taking secret pastry classes, but we’ll know the truth – sometimes the most impressive dishes are actually the easiest to make.